
A Tip From Kinetic Computer Services ...
Windows Server Backup in Windows 2016 or Windows 2012 does not see the Dell RD1000 as a backup destination
| Previous tip: | Need to Eject Removable Media From the Command Line |
| Next tip: | Unable to Print Specific E-mail Messages in Outlook |
| Tips Main Page |
Description of the Problem
You have a Dell server that has a RD1000 drive and Windows Server 2016 or Windows Server 2012 installed. You would like to use the Windows Server Backup utility included with the operating system to back up the internal hard drive(s) onto the RD1000. The RD1000 has a drive letter and is working as a general-purpose storage device, but Windows Server Backup does not "see" it or allow you to select it as a backup destination.
Cause
Windows Server Backup does not currently support the RD1000 as a backup destination, however, there is an easy and fully satisfactory workaround involving a virtual hard disk (VHD).
Workaround
First of all, this tip assumes you have already installed Windows Server Backup. If not, use Server Manager, "Add Roles and Features" to add the Windows Server Backup feature to your Windows 2016 or Windows 2012 system.
The general steps involved in using the Dell RD1000 as a destination for Windows Server Backup are as follows:
- Create a virtual hard disk (VHD) on the RD1000 using Disk Management or Hyper-V Manager.
- Attach and initialize the VHD using Disk Management.
- Create a volume on the VHD and format it using Disk Management.
- Configure Windows Server Backup to use the VHD.
A detailed walkthrough of these steps is provided below. In this walkthrough, the RD1000 is using drive letter F:.
NOTE: Step 1, create a VHD, can be done in either Disk Management or Hyper-V Manager. The process is a little more straightforward in Disk Management, and Disk Management is required for Steps 2 and 3, so that is what is used here in Step 1.
Creating a virtual hard disk (VHD) in Disk Management
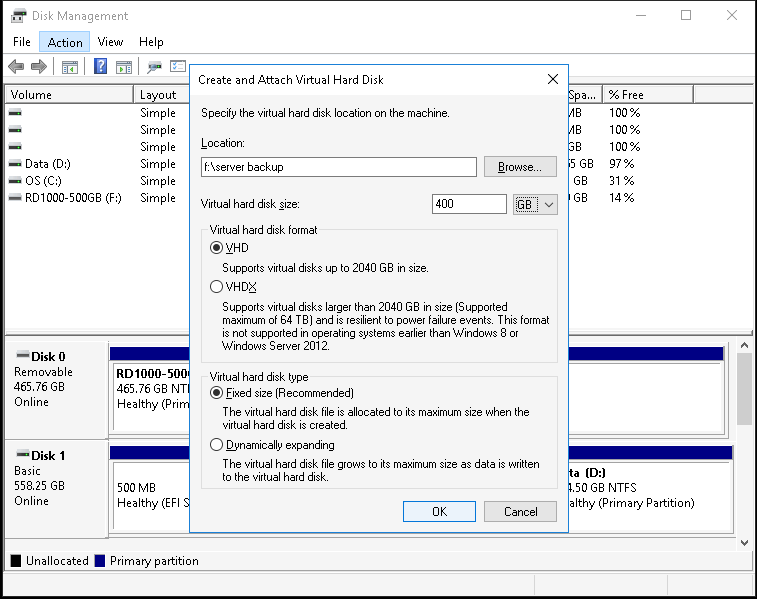
1. In Disk Management, create a new virtual hard disk (VHD). Note that virtual hard disks can be either .VHD files or .VHDX files. For brevity's sake, we refer to all virtual hard disks as VHDs.
a. Choose the name and location of the VHD on the RD1000, e.g. "F:\server backup."
b. Choose the size of the VHD. The VHD will be dedicated to Windows Server Backup, so if you plan to use the RD1000 for anything else, size the VHD to leave enough space on the cartridge for your other needs. Otherwise, you can use all the space on the cartridge for the VHD. Be sure to pay attention to whether you're specifying the size in Mb, Gb, or Tb.
c. If the virtual hard disk will be 2,040 Gb (2 Tb) or less, then you can choose either the .VHD format, which provides greater compatability with legacy systems, or the .VHDX format, which has some performance and redundancy improvements. If the virtual hard disk will be larger than 2,040 Gb, then you must use the .VHDX format.
d. Press OK to begin creating the VHD. For large disks, this can take several hours or more.
2. In Disk Management, initialize the VHD.
a. Scroll down in the lower window and find the VHD you just created. If you used Hyper-V Manager to create the VHD, you must use "Action -> Attach VHD" to attach the virtual hard disk to Disk Management. If you created the VHD in Disk Management, it will already be attached. The attached VHD will have a status of "Not Initialized" and will have a red warning icon.
b. Right-click on the disk and choose "Initialize Disk" (or left-click on it and choose "Actions -> All Tasks -> Initialize Disk" from the menus). If your VHD is larger than 2,048 Gb, choose GPT. Otherwise, it shouldn't make any difference whether you use MBR or GPT. The status of the disk will change to "Online."
3. In Disk Management, create a volume and format it.
a. Right-click on the unallocated space in the new disk. Create a new Simple Volume.
b. Give the new Simple Volume the maximum size and give it a drive letter, e.g. "G:."
c. Format the partition with NTFS. Give the volume a name, e.g. "Server Backup." Perform a Quick Format. This should only take a moment.
d. You should now have a new "Healthy" partition with a drive letter.
4. Now you can go to Windows Server Backup and create a new one-time or scheduled backup using the attached VHD on the RD1000 as a destination.
a. You much choose "Back up to to a hard disk that is dedicated for backups."
b. At the "Select Destination Disk" screen, the VHD may not appear at first. Click on "Show All Available Disks..." to make it appear.
c. If you selected "Full Server" at the "Select Backup Configuration" screen, then you may get a notice that a volume you selected to be backed up is the backup storage destination. Choose "OK" to allow it to remove that volume from the backup. You can't back up a volume to itself, or at least, you sure don't want to try!
NOTE: The VHD you attached in Step 2 above will not automatically re-attach to the system when it is rebooted. This means that your backups will fail unless you reattach it after reboot. To have the virtual disk reattach automatically, see our tip, "Need to automatically attach virtual disk on Windows Server."
Posted on November 20, 2017
© Copyright Kinetic Computer Services
| Previous tip: | Need to Eject Removable Media From the Command Line |
| Next tip: | Unable to Print Specific E-mail Messages in Outlook |
| Tips Main Page |
This tip is a free service of Kinetic Computer Services - professional network consultants serving the Houston area since 1998.
Reproduction of this document without the author's consent is prohibited.